
I. HPC Setup Without sudo — CUDA, CMake & .bashrc Configuration
sudo; installing CMake locally from a pre-built binary; and structuring your ~/.bashrc with a modular ~/.bashrc.d/ system for managing CUDA versions, libtorch, cuDNN, and custom paths.
1. Installing CUDA Without sudo
CUDA only truly requires two things: the nvcc compiler and user-space libraries like libcudart. Both can be installed entirely inside your home directory:
$HOME/cuda1) Check Your Linux Distribution and Architecture
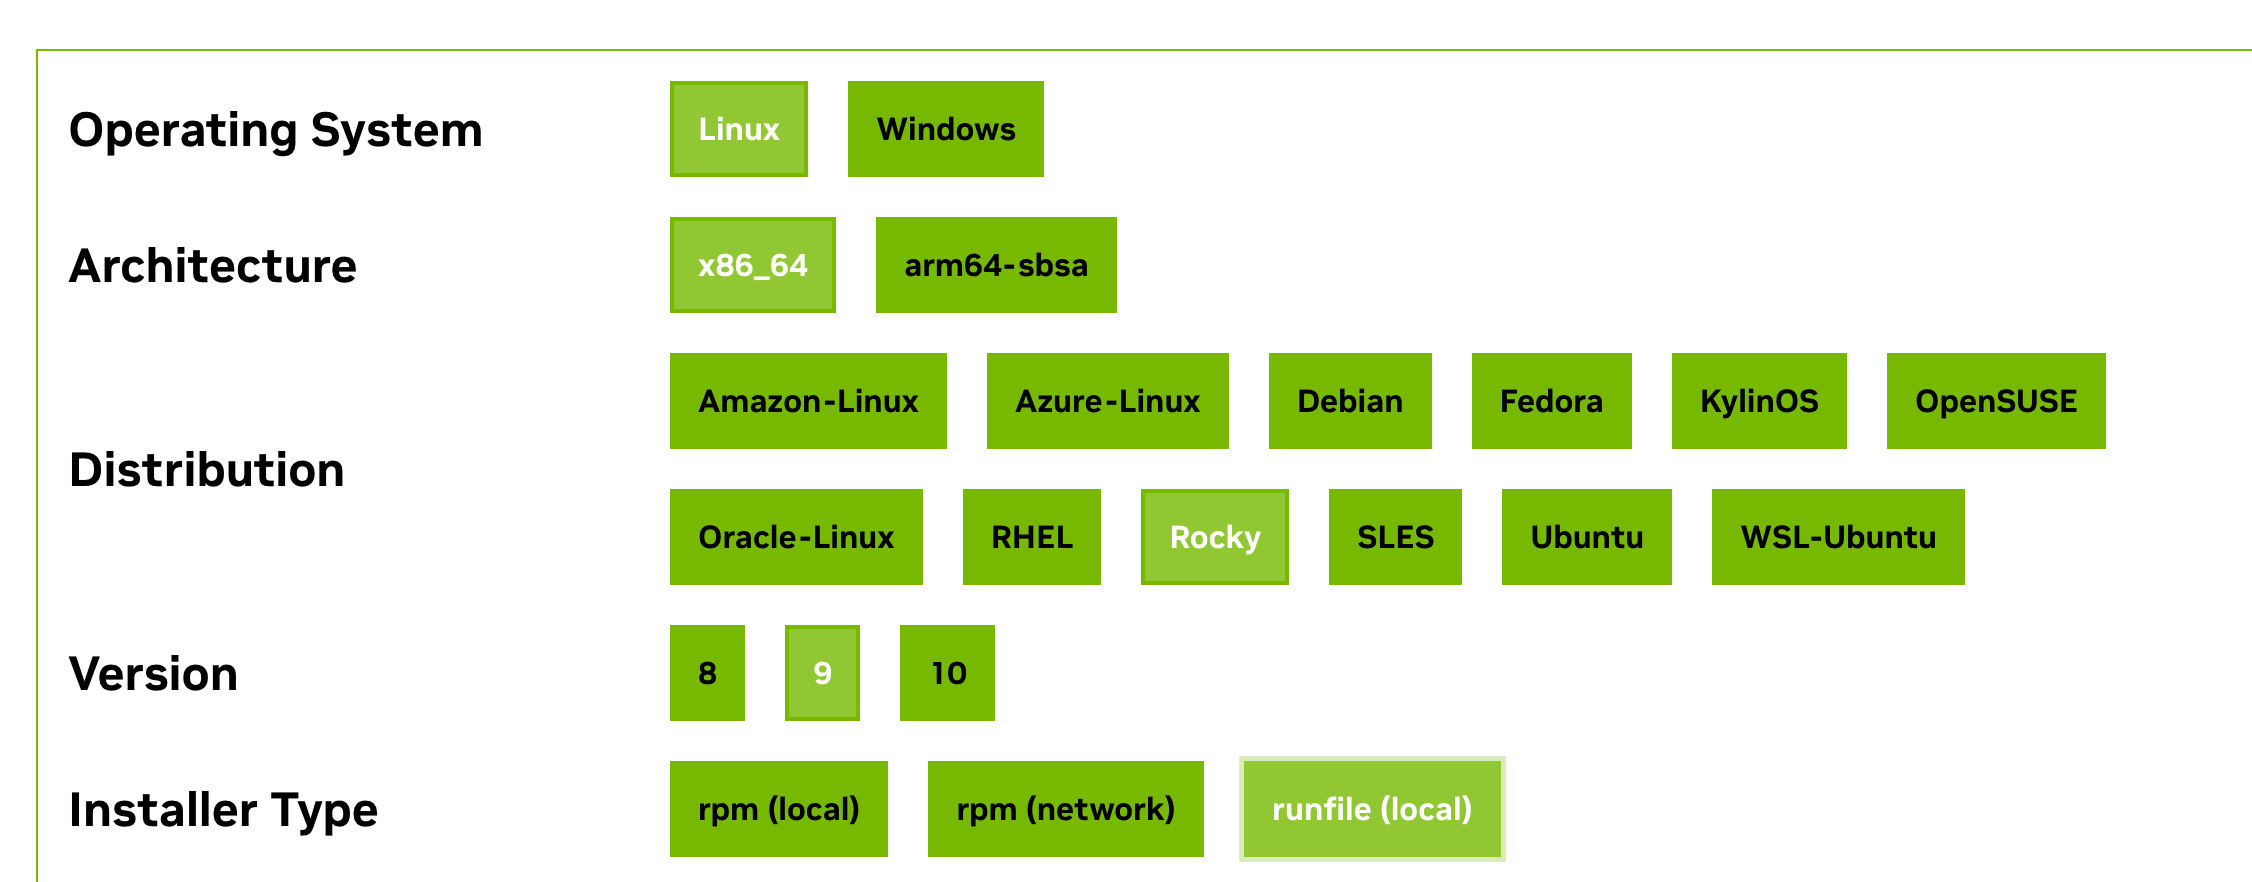
cat /etc/os-releaseNAME="Rocky Linux"VERSION="9.7 (Blue Onyx)"ID="rocky"...uname -mx86_642) Download the Runfile from NVIDIA
Go to: https://developer.nvidia.com/cuda-downloads
Select your OS/architecture and choose the runfile (local) installer type.
The downloaded file will be named something like:
cuda_12.9.1_575.57.08_linux.runnvidia-smi.3) Install the Toolkit Only (No Driver)
Make the runfile executable:
chmod +x cuda_*.runRun the installer with driver installation disabled:
./cuda_12.9*.run \ --silent \ --toolkit \ --toolkitpath=$HOME/cuda-12.9 \ --no-drm \ --no-man-page| Flag | Purpose |
|---|---|
—silent | Non-interactive installation |
—toolkit | Install CUDA Toolkit only |
—toolkitpath | Target installation directory (user home) |
| No driver flag | Avoids any root requirement |
4) Configure Environment Variables (Modular .bashrc.d)
Create the directory:
mkdir -p ~/.bashrc.dCreate a CUDA config file:
nano ~/.bashrc.d/cuda.shWrite the following:
# ===== Default CUDA =====export CUDA_HOME=$HOME/cuda-12.9export PATH=$CUDA_HOME/bin:$PATHexport LD_LIBRARY_PATH=$CUDA_HOME/lib64:$LD_LIBRARY_PATH
# ===== CUDA version switcher =====use_cuda () { local ver=$1
if [ ! -d "$HOME/cuda-$ver" ]; then echo "CUDA $ver not found in \$HOME" return 1 fi
export CUDA_HOME=$HOME/cuda-$ver export PATH=$CUDA_HOME/bin:$PATH export LD_LIBRARY_PATH=$CUDA_HOME/lib64:$LD_LIBRARY_PATH
echo "Switched to CUDA $ver" nvcc --version | head -n 1}Ensure ~/.bashrc loads all files in ~/.bashrc.d/ (add if not present):
if [ -d ~/.bashrc.d ]; then for rc in ~/.bashrc.d/*; do [ -f "$rc" ] && . "$rc" donefiReload the environment:
source ~/.bashrc5) Verify the Installation
Check the compiler:
nvcc -VIf a CUDA version string is printed, the toolkit is installed correctly.
Check GPU availability:
nvidia-sminvidia-smi runs successfully, the server already has a GPU driver installed and you can use the GPU. If it fails, the GPU driver is missing — without sudo you cannot install the driver yourself, meaning CUDA can only be used for compilation, not for GPU execution.2. Installing CMake Locally (No Root)
1) Download the Official Pre-built Installer
The official binary installer requires no source compilation, no gcc or make, installs quickly, and is compatible with most Linux environments.
cd ~wget https://github.com/Kitware/CMake/releases/download/v3.29.6/cmake-3.29.6-linux-x86_64.sh2) Install to Your User Directory
bash cmake-3.29.6-linux-x86_64.sh --skip-license --prefix=$HOME/.local| Flag | Purpose |
|---|---|
—skip-license | Skip the interactive license confirmation |
—prefix=$HOME/.local | Install into the user-level software directory (Linux convention) |
3) Add to PATH and Verify
echo 'export PATH=$HOME/.local/bin:$PATH' >> ~/.bashrcsource ~/.bashrccmake --version3. .bash_profile — Auto-load .bashrc on Login
# Load aliases and functions from .bashrcif [ -f ~/.bashrc ]; then . ~/.bashrcfiThis ensures .bashrc is sourced automatically on every SSH login session.
4. .bashrc Section-by-Section Walkthrough
1) System Initialization
Loads the system-level bash configuration (modules, colors, completions, etc.):
if [ -f /etc/bashrc ]; then . /etc/bashrcfi2) User PATH Initialization
Adds user program directories to PATH without creating duplicates:
# Only add if not already present (prevents duplicate PATH entries)if ! [[ "$PATH" =~ "$HOME/.local/bin:$HOME/bin:" ]]then # Prepend user-level bin dirs so locally installed tools take priority PATH="$HOME/.local/bin:$HOME/bin:$PATH"fi
# Export so child processes (Python, bash, etc.) inherit this PATHexport PATH3) The .bashrc.d Modular Config System
Splits shell configuration into separate, focused files. Recommended when managing multiple CUDA versions, multiple Conda environments, multi-project research, or many custom aliases.
# Load all user config modules from ~/.bashrc.d/if [ -d ~/.bashrc.d ]; then for rc in ~/.bashrc.d/*; do # Only source regular files (not directories or other types) if [ -f "$rc" ]; then # Source the file — equivalent to: source "$rc" # Makes aliases, functions, and exports take effect immediately . "$rc" fi donefi4) PATH and Library Configuration
CUDA 12.6 Environment
# ===== CUDA 12.6 =====export CUDA_HOME=$HOME/cuda-12.6export PATH=$CUDA_HOME/bin:$PATHexport LD_LIBRARY_PATH=$CUDA_HOME/lib64:$LD_LIBRARY_PATHSets the default CUDA version to 12.6.
libtorch Headers and Library Paths
# ===== libtorch — PyTorch's official C++ API and runtime =====export CPATH=$HOME/libtorch/include:$HOME/libtorch/include/torch/csrc/api/include:$CPATHexport LIBRARY_PATH=$HOME/libtorch/lib:$LIBRARY_PATHexport LD_LIBRARY_PATH=$HOME/libtorch/lib:$LD_LIBRARY_PATHEnables calling PyTorch from C++.
| Use Case | Keep? |
|---|---|
| Writing C++/CUDA code with libtorch | ✔ Required |
| Python-only PyTorch usage | ❌ Can be removed |
cuDNN Paths
Only needed for C++ builds, custom CUDA kernels, or TensorRT:
# ===== cuDNN =====export CPATH=$HOME/cudnn/include:$CPATHexport LIBRARY_PATH=$HOME/cudnn/lib:$LIBRARY_PATHexport LD_LIBRARY_PATH=$HOME/cudnn/lib:$LD_LIBRARY_PATHCUTLASS
# ===== CUTLASS =====export CUTLASS=$HOME/cutlassCustom Command Paths
# ===== PATH: tells the shell where to find executables =====export PATH=$HOME/.local/bin:$PATHexport PATH="$HOME/bin:$PATH"On a no-root HPC cluster: install CUDA with
--toolkitpath=$HOME/cuda-X.Y --no-drm, install CMake with --prefix=$HOME/.local, and keep your shell config clean by splitting everything into ~/.bashrc.d/ modules — remember that CUDA without a GPU driver can compile but not run.